Friday 13 March 2015

Sweet Glutinous Vietnamese Rice Dumplings in Ginger Syrup ( Chè trôi nước) ( Vegan & Gluten Free)

Yum

For my next recipe, i've decided to post something a bit closer to home. My mother being from Viet nam, i grew up eating a lot of vietnamese sweet dessert puddings known as Chè and let me tell you, the stuff is damn good. There's a lot of different varieties of Chè, but the ones i love the most always include the sticky rice dumplings, so i'm sharing with you my favourite one of them all! Chè trôi nước ( which if you put in google translates into tea floating water haha ). This is quite a heavy dessert and no way by any means is it healthy but it's totally worth treating yourself once in a while with this yummy goodness. There are so many small variations that can be made with vietnamese desserts, and just like with western sweets, you can tinker the recipe to your liking. For example in some Chè trôi nước recipes, fried onion or shallots are added into the filling but i like it better without so i choose to add shredded coconut instead and it still tastes heavenly! 


Just to give you an idea of what it taste like, the starchy mung bean paste makes an excellent filling for the smooth glutinous sticky rice flour outer later because of the contrasting textures. Despite the term "glutinous" the flour is indeed gluten free, it's just used to describe the stickiness of the texture. If you've ever had Japanese mochis then you'll know how the paste oozes out of the gooey outer rice layer which is to die for ( it's basically the same flour that we're using ). The sweet brown syrup is infused with ginger to give it depth,it'll add a slight spicy tinge to complement and even out the sweetness of the brown sugar. And to top everything off, coconut milk is basically liquid silk so it doesn't get much better than that. 

Ingredients for Rice Balls (  Serves 6 - 10 ,makes 12-15 stuffed balls and a few smaller rice balls):
  • 350g of glutinous rice flour ( aka sweet rice flour ) + 50g to prevent stickiness & for coating 
  • 300 ml of lukewarm water
  • 200g of split mung beans
  • 2 tablespoons of sugar ( preferably white or cane )
  • 6 tablespoons of shredded coconut
  • pinch of salt

Ingredients for Ginger Syrup/Soup:
  • 400g of brown sugar ( you can use palm or cane as well and use more sugar if you want a thicker consistency )
  • 1 litre water 
  • 1 peeled & thinly sliced ginger
  • Roasted sesame seeds for topping

Ingredients for Coconut Sauce:
  • 1 can of 400ml coconut milk ( although i prefer coconut cream since its thicker )
  • 1 teaspoon of sugar 
  • A pinch of salt 
  • 1 teaspoon of tapioca flour or cornflour ( optional, to thicken )


Instructions:

1. Soak the split mung beans in water for at least an hour, the longer the better.Wash and drain the beans and then cook them like you would rice. Make sure the water completely covers the beans and cook on low heat until they expand and soften.

3.  To make the bean paste filling, purée your cooked beans, add sugar, shredded coconut, pinch of salt and mix. Once you've mixed everything together, put the paste in the fridge so it cools down quicker. 


4.  To make the dumpling dough slowly add the 300ml of lukewarm water whilst continuously kneading. Keep kneading until the dough is no longer sticky but still moist and then cover with a towel. 


5.  Take the mung bean paste out of the fridge ( they should still be warm after 5-10 minutes in there ) and roll 12 to 15 balls between your palms. 

6.  Now to make the actual dumplings, you want to grease your hands with some vegetable oil to prevent stickiness. Pinch off some of the dough, roll it into a ball and flatten it. Then place one of the mung bean balls in the middle of the dough and seal the edges. Roll the dumpling between your palms until its smooth, dust it with some rice flour and repeat until all the paste is gone. 


7.  Use the leftover dough to roll into small unfilled rice balls. 
To cook the dumplings you have to fill a pot with some water and bring the heat up to a boil before adding the dumplings and lowering the heat to medium. When the balls float to the surface then they're ready ( although i always leave them in for a few extra minutes to make sure theyre totally cooked ). Have a big cold bowl of water ready and transfer the dumplings in when they're cooked.

8.  To make the ginger syrup/soup , Over medium heat add the 1L of water into a pot along with the brown sugar. When it comes up to a boil, add in the sliced ginger, slightly lower the hear and continue to cook for another 10 minutes before removing from heat. Transfer the dumplings from the cold water into the pot with the syrup. 


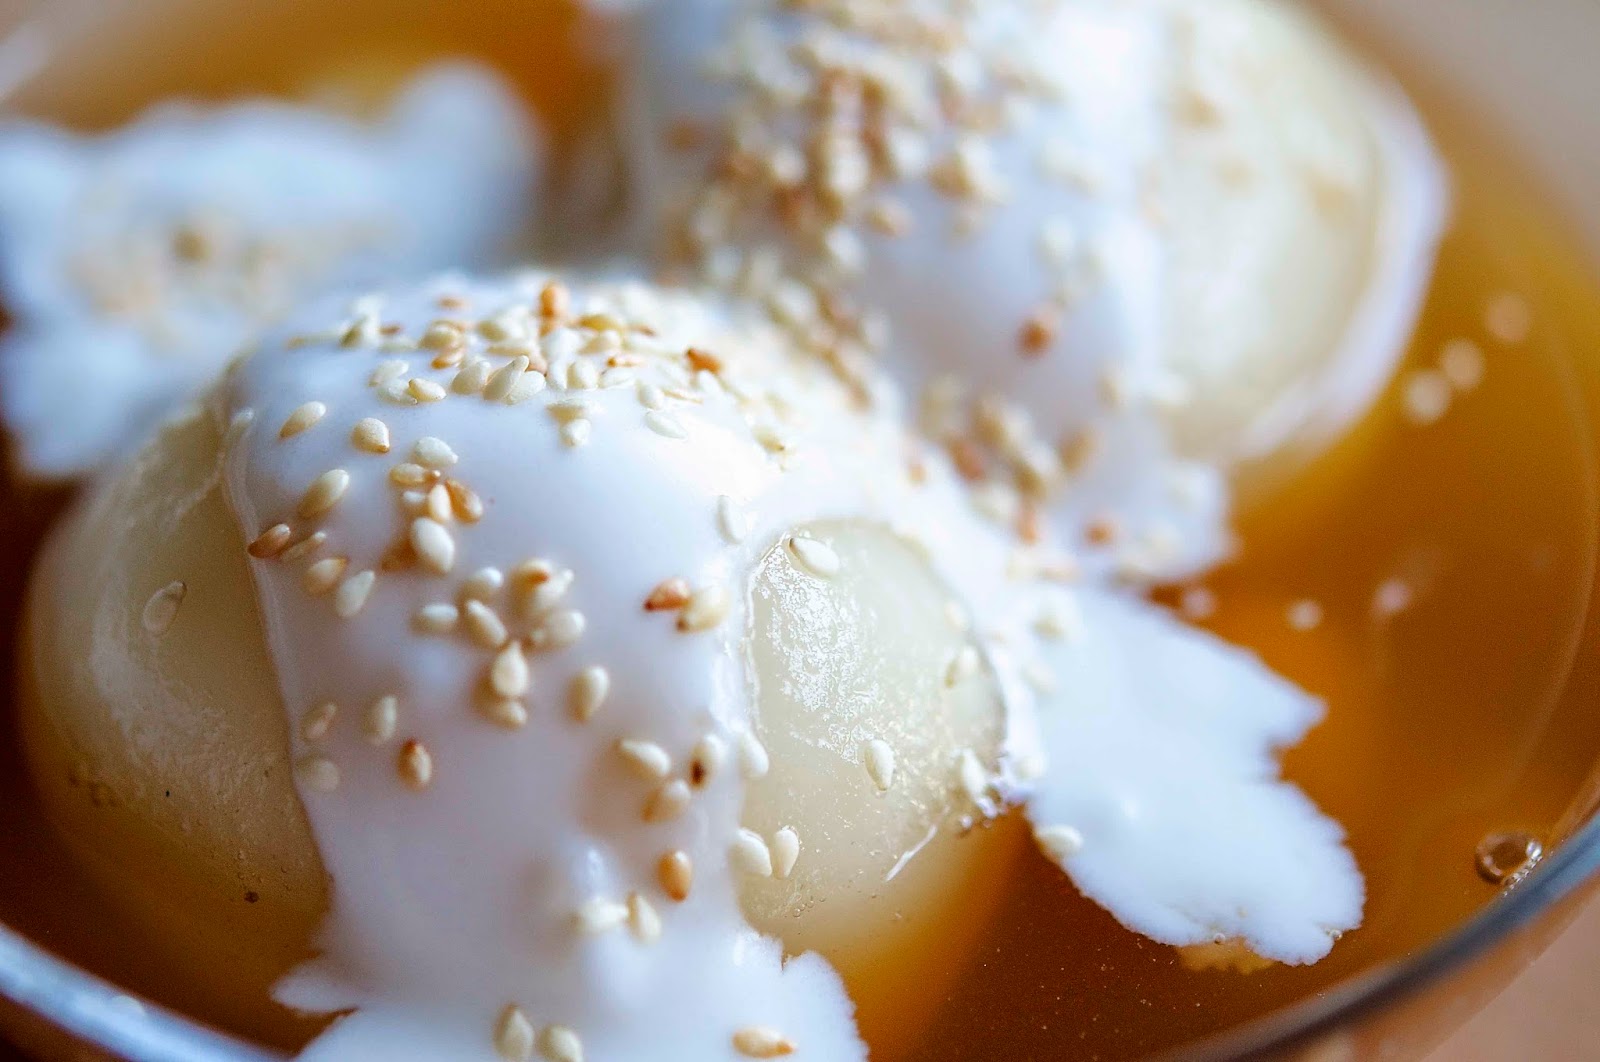
9.  To make the coconut sauce, combine all the ingredients over medium heat whilst continuously stirring. Cook for around 5 minutes or until the sauce is hot enough for your liking. Serve the warm dumplings with syrup in bowls ( without the ginger ), spoon some coconut sauce on top and garnish with some roasted sesame seeds AND EAT! 


Nutritional Information:1 serving ( Considering that you're serving 10 people ) contains: 496 calories, 13.1 g of fat , 86.36 g of carbs ( 5.4 g of fiber = 80.96 net carbs ) & 9.68 g of protein.


Thursday 5 March 2015

Matcha Green Tea Shortbread Cookies with White Chocolate Chips ( Low Carb, Gluten Free & Vegan )

Yum

Hello everyone! I've decided to do a mini recipe series consisting of baked goods containing Matcha Green Tea as the main flavour ingredient because well i'm asian, and what asian doesn't love Green Tea? ( sorry for the stereotype but in most cases it's true! ).  I'm starting the series off with a SUPER easy 5 ingredient, low carb, keto, gluten free Shortbread recipe which i hope you all will enjoy! 


If you're looking for a soft chewy cookie, this won't be it. The cookie itself holds well together without being too hard or too crumbly whilst delivering a strong buttery Matcha flavour which compliments the crunchy lightly caramelised white chocolate chips. Keep in mind that Matcha is an acquired taste so if you haven't tried it yet i can't guarantee that you'll love these cookies because the flavour is dominant. But even then, you can just omit it from the recipe and end up with a delicious buttery low carb shortbread!  


To be completely honest , as a child i didn't always like Green Tea flavoured goods despite growing up in Asia. I just remembered it tasting super bitter but i guess that my tastebuds have evolved since then. In fact i only started to enjoy the flavour of Green Tea once i left China which is really unfortunate because now i go crazy for the anything green tea related, including ice cream, chocolates ( green tea kitkat? to die for ), cakes, candies, buns and basically anything you can imagine with that sexy shade of electric green. The tragic part: I can rarely get my hands on any of these yummies because its not exactly a popular flavour here in Switzerland... :(

On top of being nomnom worthy , this shortbread recipe is also LCHF which applies for all you people out there following the ketogenic diet, gluten free and i've with a vegan friendly version too! 


Ingredients ( makes 30 cookies ):
  • 2 1/2 cups of blanched almond flour
  • 125g of chilled unsalted butter ( for vegans, use vegan butter/spread ) 
  • 1/2 cup of xylitol ( or sugar for non low carbers )
  • 1 - 1 1/2 tablespoons of matcha green tea powder
  • 60g - 100g roughly chopped white chocolate ( optional )( for vegans, use vegan white chocolate ) 

Notes: 

  • I used 60g of Swiss Cailler white vanilla chocolate but next time i would add closer to 100g.
  • If you're super cautious about the carbohydrates in white chocolate , feel free to exclude it ( although i think its worth that extra bit of carbs )or just use 70% + dark chocolate instead. 


Instructions: 

  1. Preheat oven to 150°C ( 300 fahrenheit ) and line baking tray with parchment paper.

  2. Mix together all the dry ingredients ( blanched almond flour, xylitol, matcha green tea powder.

  3. Cube the cold butter and massage it into the dry ingredients, the "dough" should be more crumbly than a smooth. ( If it gets too smooth, put the "dough" in the fridge for 5-10 minutes to firm up again and continue to massage it until everything is blended together with a crumbly texture ).

  4. Add in the chopped white chocolate.

  5. Flatten the cookie dough with a rolling pin, it should be around 1 cm thick. Then use whatever shape cookie cutters you want! ( if you don't have a rolling pin or cookie cutters, just use your hands to make some flattened cookies, just make sure they're around 1 cm thick ). 

  6. Place the cookies gently on the baking tray and bake in the oven for 25-30 minutes. Allowing the cookies to cool for at least 15 minutes before handling them. 


Nutrition Information:

1 Cookie ( including 60g white chocolate ) contains: 98 calories, 8.4 g of fat , 2.4 g of carbs (1 g of fiber = 1.4 g net carbs ) & 2 g of protein.

Saturday 28 February 2015

Super Moist Kohlrabi & Blackberry Loaf with Lemon Cream Cheese Topping ( Low Carb & Gluten Free )

Yum


So last week, I had kohlrabi ( or german turnip ) for the first time in my life and to my surprise i actually loved it! It was crunchy but with a very sweet mild taste ( almost like the sweetness of carrots ) and my immediate thought was that it would taste great in a cake, so naturally i looked up dessert recipes that might have included kohlrabi but came up with nothing.

I literally love the taste of kohlrabi so much that i've been eating it nearly everyday since and i ask myself WHERE HAS THIS HEAVENLY BULB BEEN HIDING ALL MY LIFE?, I could have been turned onto vegetables much sooner than the age of 15. But oh well, better late than never. This is basically when i came up with the idea to make a sweet loaf that included kohlrabi, despite my friends confused reactions ( but it secretly motivated me even more to make this recipe work hihi, shhh )

Since kohlrabi is naturally sweet, i figured that the loaf needed something tangy to even out the flavour, thus the addition of blackberries. Honestly who would have thought that blackberries and kohlrabi would exist in perfect harmony on the palate, coupled with lemon cream cheese frosting = party in my mouth!


CAUTION: This is a very moist melt-in-your-mouth loaf, you have been warned. 


Ingredients for 1 Loaf ( around 10 slices ):

  • 1 1/4 cup of blanched almond flour
  • 1/4 cup of coconut flour
  • 1 cup of shredded kohlrabi ( around half a kohlrabi ) 
  • 150g of blackberries ( i used frozen but fresh would probably be better )
  • A pinch of salt
  • 2 teaspoons of baking powder
  • 1/2 vanilla bean pod ( or a teaspoon of vanilla extract )
  • 3 eggs
  • 1/3 cup of xylitol ( or sugar if you're not doing low carb )
  • 1/2 cup of unsweetened apple sauce
  • 1 teaspoon of cinnamon 
  • 1/2 teaspoon of nutmeg
  • 1/4 cup soy milk ( or any milk of your choice )


Ingredients for Low Carb Lemon Cream Cheese Topping ( Optional ):

  • 100g-130g of cream cheese
  • 2-3 teaspoons of lemon juice 
  • 10-15 drops of liquid stevia ( adjust to taste ) 


Instructions:

  1. Preheat your oven to 175 °C ( 350 farenheit ) and line your loaf tin with parchment paper or spray some cooking oil/butter.

  1. In a bowl mix together your dry ingredients ( almond flour, coconut flour, baking powder, xylitol, cinnamon, vanilla, nutmeg and salt ).

  1. Add in the wet ingredients ( eggs, soy milk and apple sauce ) and mix with the dry ingredients until everything is incorporated.

  1. Mix in the shredded kohlrabi and follow that by gently folding in the black berries ( by gentle i mean you want to try to prevent the berries from popping ).

  1. Add the batter into you loaf tin and bake for approximately 1 hour.
  2. ( Optional step ) Whilst your loaf is baking whip up all the ingredients for the lemon cream cheese topping ( or any of your favourite toppings! ).
  3. Turn off your oven and leave it in for another 20 minutes before taking it out to cool completely. ( Optional step ) When your loaf is cooled, spread your topping evenly and there you have it! Super moist kohlrabi & blackberry loaf. Nomnomnom.


Nutrition Information:

1 slice ( excluding topping ) contains: 140.7 calories, 8.6 g of fat , 7.4 g of carbs ( 4 g of fiber = 3.4 net carbs ) & 5.7 of protein.

Sunday 22 February 2015

Healthy Avocado Fudge Brownies ( Low Carb & Gluten free )

Yum
Hello everyone! This is my first post and to be honest I don't really know how to introduce myself. So in a nutshell, after going through some quite drastic changes in my life recently including moving out of my mothers and starting university in a new city, i've decided to start a cooking blog and finally share my love for food with the internet. 


Anyways back to the main reason why you're here. Avocados seem to be the craze lately due to its rich creamy texture and well, generally being good for you! So with that being said , i'm a sucker for dense fudgey brownies ( i'm personally not a fan of cakey ones at all ) and i wanted to share with you my recipe for a healthier, low carb and gluten free alternative to your traditional fudge brownies by substituting butter for - you guessed it! Avocados! 


In case you're worried that your brownies will taste like avocados, i promise you they won't. In fact i find they bring out an even more intense chocolate flavour which will leave you craving fo' some mo' choco. Oh one more thing, they're even fudgier the next day!


Ingredients (makes 8 brownies):

  • 1/2 cup of blanched almond flour
  • 1/4 cup cocoa powder ( or 4 tablespoons )
  • A pinch of salt
  • Around a teaspoon baking powder
  • 1/2 vanilla bean pod ( or a teaspoon of vanilla extract )
  • 1 ripe avocado ( should measure around 1/2 cup )
  • 4 egg whites 
  • 1/4 - 1/2 cup of Xylitol depending how sweet you like it ( If you're not doing the low carb thing or you don't mind the extra calories then feel free to use sugar )
  • 50g roughly chopped 60%-85% dark chocolate 
  • 50g roughly chopped macadamia nuts or any nut of your choice ( optional ) 
  • 20g roughly chopped dark chocolate to sprinkle on top (optional)

Instructions:

  1. Preheat your oven to 175 °C ( 350 farenheit ) and line your 8x8 inch ( 20x20 cm ) pan with parchment paper or spray some cooking oil.

  2. In a small bowl, purée your avocado with a hand held blender until it's smooth or just mush it up as best as you can with a fork.

  3. In a separate bowl, combine your blanched almond flour, cocoa, salt, baking powder, xylitol and vanilla. 

  4. Once the dry ingredients are mixed, add in the egg whites and avocado and mix it all up. 

  5. Incorporate the chopped chocolate and macadamia and pour the batter into your baking pan.

  6. Sprinkle the 20g of chopped chocolate on top and bake in the oven for 30 - 35 minutes. 

  7. Let it cool before you slice into it, and voilà you have your healthier chocado brownies! 


Nutrition Information:

1 slice of your traditional brownie contains: 242 calories, 10.1 g of fat, 39 g of carbs ( 0 g of fiber ) & 2.7 g of protein. 

1 slice of a chocado brownie ( excluding the macadamia nuts & extra chocolate on top ) contains: 130.6 calories, 9.5 g of fat , 5 g of carbs ( 2.5 g of fiber = 2.5 net carbs ) & 4.375 g of protein.